Easter Egg Dying for Individuals with Disabilities
- Apr 17, 2019
- 2 min read

Holiday times can be difficult for parents of special needs children. There are so many fun holiday traditions. However, many special needs parents struggle to find ways to include their kids. Dying Easter Eggs can be fun (and easy) for all disabilities and abilities!
When I look back at my own childhood, I did not miss out on much during the holidays. The night before Easter I dyed eggs and hunted for them the next day. I remember one year my mom filled eggs with confetti and we threw them at the ceiling! She only did that one year though. Maybe it was the days of vacuuming that discouraged her from trying that again! When I look back, I also realize all the extra help I needed to perform these traditions. So my mom and I scoured the internet for Easter Egg Dying ideas that require little or no intervention for children with disabilities.

Preparing Eggs for Dying
Many people overcook eggs when boiling to dye for Easter. They error on the side of caution. No one wants a runny Easter Egg! However, over cooking them is a waste of food.
Here is a sure fire way of getting perfect Easter Eggs for dying, hiding and eating!
Place eggs in a large pot of water. Cover and bring water to a full boil.
Turn off heat and keep covered.
Let the eggs soak the hot water. 18 minutes for extra large eggs,15 minutes for large eggs and 12 minutes for medium.
Run cold water over the eggs. Once when they are cool, drain and refrigerate.
For vibrant eggs soak in vinegar about two minutes and wipe dry before dying.
Materials Needed

Supplies needed for both whipped cream and shaving cream method
Eggs
Vinegar
Large pot with cover
Paper Towels
Rectangular Pan
Butter knife or spoon
Whipped Cream or Shaving Cream
Food Coloring (I recommend gel coloring used for cake decorating. The colors are more vibrant)
Large plastic bag if touching the whipped cream or shaving cream is an issue
Non-latex gloves
Whipped Cream Dye Method
Place whipped cream in a rectangular pan. Spread whipped cream to about an inch thickness.
Drizzle the dye over the whipped cream. Experiment with colors and have fun!

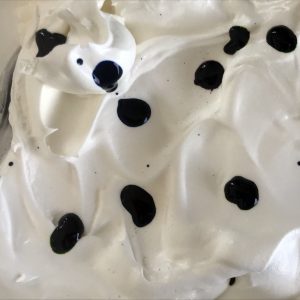

Take a knife and swirl dye throughout whipped cream.
Place eggs in the whipped cream and move around with a spoon. I used my hands and just washed off the dye afterward. Non-latex gloves can also be worn.

I let my eggs stay in the whipped cream for a few minutes.
Take out and wipe off whipped cream.
***whipped cream and dye can also be placed in a large plastic bag and swished around for kids and adults with sensory issues.
***my tray worked great as a work station.


Whipped Cream Dyed Easter Eggs
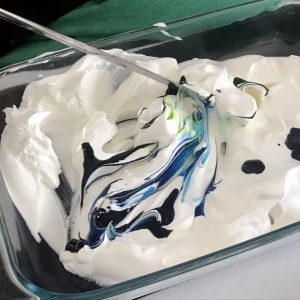
Shaving Cream Dye Method
Basically, follow the same exact steps as the Whipped Cream Method, but use shaving cream instead of whipped cream. Of course, this method is not appropriate for kids who will try to eat the shaving cream.
However, for older kids and adults this is a method to use for more brilliant colors. For me it was easier to control the moving the egg around in the thicker cream.

Shaving Cream with Dye
Happy Easter and Happy Easter Egg Dying!
Until Next Time, Keep Rollin’ and Keep Smilin’


Comments